Monday, 27 June 2011

Adding Columns to PageBlockTable Dynamically.

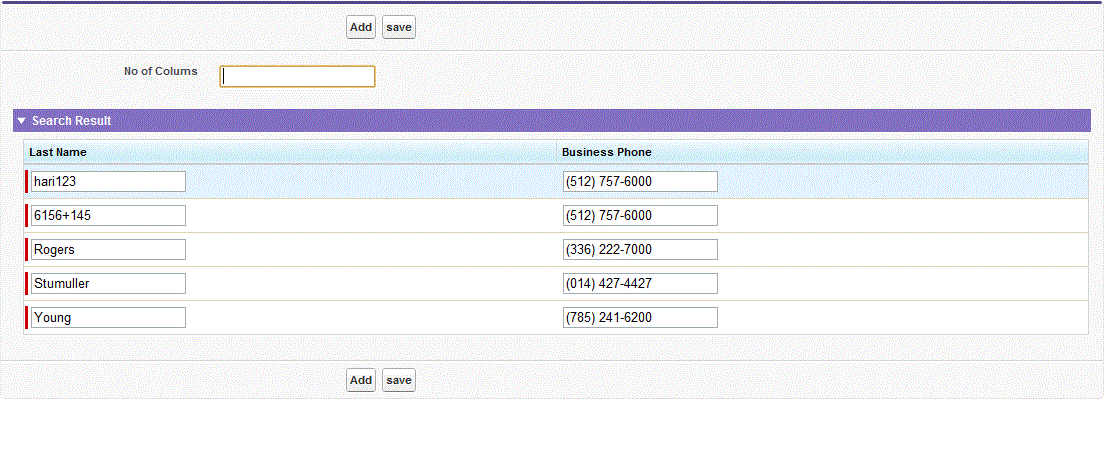
We have client requirement to add columns dynamically to Page block table,Based on user input,Number of columns to be added,we have to add that columns to table.We tried lot,and my community friend sharma also helped me in this scenario.I will explain this step by step,Actually with dynamic way we can't prioritize columns to add table.That is if you give 5 as input any 5 columns are adding to Table,to avoid that problem we need to place, field name, object Name, field value in custom settings.if user input is 5,then first 5 columns are added in this way.
   1 . Creating Custom Settings.
          Create custom settings and name it as "Custom fields" with fields fields FieldName,FieldValue,Object Name. While creating Custom setting ,Select Settings type as "List" and Visibility as "public".Create records in to custom settings like
              Lastname, 1,Contact
              phone,2,Contact
              Email,3,Contact
              Department,4,Contact.
2.Here Basic concept is dynamic binding the fields.
Here i did, first i query the fields list from custom settings, using describe object methods getting fields labels in to Map(o display headers for Table),Based on user input binding that number of fields from custom settings.

Controller:-

    public class Demo {
    public map<String , String> mapFieldToShow{get;set;}
    public map<String , String> mapFieldToShow1{get;set;}
    list<String> lstfield=new list<String>();
    list<String> lstflabel=new list<String>();
    
    public Integer noOfColumns // User input
    { 
       get; 
       set
         {
    
               listFieldToShow = new List<String>(); 
            // listFieldToShow.addAll(lstField); 
               for(integer i=0;i<value;i++)                          //value is user input.
               listFieldToShow.add(lstFlabel[i]);                // we are binding that number of fields.
    
           } 
    }
    
    public List<String> listFieldToShow {get;set;}
    List<String> fieldLabels=new List<String>();
    public  Demo()
    {        
    Contactfields__c objp=[select objectName__c from Contactfields__c limit 1];
    SObjectType objToken = Schema.getGlobalDescribe().get(objp.objectName__c);      
    DescribeSObjectResult objDef = objToken.getDescribe();                    
    Map<String, SObjectField> fieldmap = objDef.fields.getMap(); 
    for(Contactfields__c obj:[select fieldName__c from Contactfields__c order by Fieldvalue__c]) // query from custom settings.
    lstfield.add(obj.fieldName__c);
    listFieldToShow = new List<String>();
    mapFieldToShow = new Map<String , String>();
    mapFieldToShow1 = new Map<String , String>();
    for(integer i=0;i<lstfield.size();i++){
    SObjectField fieldToken = fieldmap.get(lstfield[i]);
    DescribeFieldResult selectedField = fieldToken.getDescribe(); 
    lstflabel.add(selectedfield.getLabel());
    mapFieldToShow.put(selectedfield.getLabel() ,selectedfield.getLocalName());
    mapFieldToShow1.put(selectedfield.getLabel() ,selectedfield.getLabel());
    }
    
    String squery='select ';                                         // Building Dynamic Query.
    for(integer i=0;i<lstfield.size()-1;i++) 
    squery=squery+''+lstfield[i]+',';
    squery=squery+''+lstfield[lstfield.size()-1];
    squery=squery +' '+'from Contact limit 20';
    System.debug('Squeryyyyyyyy'+squery);
    listTableResult =Database.query(squery); 
    
    
    }
    public List<Contact> listTableResult {
    get;set;
    }
    
    public PageReference Add() 
    {
    
                return ApexPages.currentpage();
    
    }
    public List<Contact> getlistTableResult() {
    
    return listTableResult;
    }
    public void setlistTableResult(List<Contact> Contacts) {
    listTableResult = Contacts;
    
    }
    public PageReference save() {   // to save updates.
    upsert listTableResult;
    return null;
    }
    }


Page:-
<apex:page controller="Demo" tabStyle="Contact">
     <apex:Form >
          <apex:pageBlock >
                <apex:pageBlockButtons >
                    <apex:commandButton action="{!Add}" value="Add"/>
                     <apex:commandButton action="{!save}" value="save"/>
                </apex:pageBlockButtons>  
                <apex:pageBlockSection >
                    <apex:pageBlockSectionItem >
                        <apex:outputLabel value="No of Colums">
                        </apex:outputLabel>
                        <apex:inputText value="{!noOfColumns}" />
                    </apex:pageBlockSectionItem>
                </apex:pageBlockSection>
                <apex:pageBlockSection collapsible="true" title="Adding Columns Dynamically" columns="1">
                         <apex:PageBlockTable columns="{!listFieldToShow.size}" value="{!listTableResult}" var="rowItem">           
                <apex:repeat value="{!listFieldToShow}" var="colItem">
                    <apex:column >
                        <apex:facet name="header" >{!mapFieldToShow1[colItem]}</apex:facet>
                        <apex:inputField value="{!rowItem[mapFieldToShow[colItem]]}"></apex:inputField>
                    </apex:column>
                </apex:repeat>
            </apex:PageBlockTable>
        </apex:pageBlockSection>
          </apex:pageBlock>
     </apex:Form>
</apex:page>


Thursday, 9 June 2011

Small URL Trick to fill data into standard user interface of an object.

While we are inserting data for an object from it's standard page, we can do one trick to fill data into page from URL.Actually for this trick we need sales force.com id's for the fields in an object.But we can't get ids for the fields in an object like object id.For this i am taking java script id's for the fields from view source. This trick executes for Names of the standard fields directly,but in case of custom fields we can go for java script id's from view source for that page.
                     i am giving the screen shot just follow the instructions,

        This is standard user interface of an object " Address"  to create new record.Here you need to observe the URL in address bar of the window.
         i.e https://ap1.salesforce.com/a01/e?retURL=%2Fa01%2Fo .     
In the above object NAME is the standard field so just observe the below URL,
        https://ap1.salesforce.com/a01/e?retURL=%2Fa01%2Fo&Name=FLEXANDSALESFORCE
click enter. Then you can observe in the following screen,
       In this way you can pass values to fields from URL.In case of Custom fields this is not works ,but with java script  id for that field from view source of that page we can get same result.

                  1 .  Right click on page,click on View source.
                  2.   Get the java script id for that field in view source.
       
 Copy that id for the field country and use that id in URL as follows
 https://ap1.salesforce.com/a01/e?retURL=%2Fa01%2Fo&Name=FLEXANDSALESFORCE&00N90000002IoEJ=INDIA
     
Then u can see,

In this way you can fill data into all fields for an object using this URL trick.

Tuesday, 7 June 2011

Displaying fields of multiple objects on Vfpage and inserting data into objects

Friends, Today i have explored on wrapper class, i have one scenario that is ,i want to display fields from multiple objects on vfpage and inserting data into objects at a time.For this requirement i have explored for that finally i came to know that we can handle it using wrapper class. My first experience with wrapper class is superb,i got solution for my requirement. I am sharing my code i hope it will helpful for you.
        I have two objects Students, Lineitems
                Student object having fields  Name,StuNumber__c
                Lineitems  object having fields Name,lineItemNumber__c
Now my requirement is show fields from both objects on vfpage and inserting data into them.
for that i have designed wrapper class .

       public class wrapperclass
         {
             public student__c Std{get;set;}
           
             public lineItem__c litem{get;set;}
           
             public wrapperclass(Student__c Std,lineItem__c lit)
             {
                 this.std = Std;
                 this.litem = lit;
             }
         }

first we need to define objects in wrapper class as shown above.We can  add more number of objects also.
To access those fields on Vfpage ,we need to declare as follows,


 <apex:repeat value="{!lstobjfields}" var="item" rendered="{!IF(lstobjfields.size > 0 , true , false)}" >
           <apex:pageBlockSection >
               <apex:inputField value="{!item.Std.Name}"/>
               <apex:inputField value="{!item.Std.stunumber__c}"/>
               <apex:inputField value="{!item.litem.Name}"/>
               <apex:inputField value="{!item.litem.Lineitemnumber__c}"/>
           </apex:pageBlockSection>
       </apex:repeat>


 I am giving complete code , u can understand by comments,

Page:-
<apex:page controller="addTextrBox" tabStyle="student__c">
  <apex:Form >
      <apex:pageBlock >
       <apex:commandButton Value="Add" action="{!addfields}"/>
       <br></br>
        <apex:repeat value="{!lstobjfields}" var="item" rendered="{!IF(lstobjfields.size > 0 , true , false)}" >
           <apex:pageBlockSection >
               <apex:inputField value="{!item.Std.Name}"/>
               <apex:inputField value="{!item.Std.stunumber__c}"/>
               <apex:inputField value="{!item.litem.Name}"/>
               <apex:inputField value="{!item.litem.Lineitemnumber__c}"/>
           </apex:pageBlockSection>
       </apex:repeat>
        <apex:commandButton Value="save" action="{!saveText}"/>
       </apex:pageBlock>
   </apex:Form>
</apex:page>

Controller:-

public class addTextrBox
{
    public List<wrapperclass> lstobjfields
        {
          get;
          set;
        }  
    public addTextrBox ()
        {
            lstobjfields = new List<wrapperclass>();
        } 
    public PageReference addfields()
        {
            try
                {
                    lstobjfields.add(new wrapperclass(new Student__c(),new lineItem__c()));   // Adding fields toVfpage when user click on Add Button.
                }
            catch(Exception e)
                {
                    ApexPages.addMessages(e);
                }
            return ApexPages.currentPage();
        }
     public class wrapperclass   // wrapper class to handle multiple objects.
         {
             public student__c Std{get;set;}
             public lineItem__c litem{get;set;}
             public wrapperclass(Student__c Std,lineItem__c lit)
             {
                 this.std = Std;
                 this.litem = lit;
             }
         }
      public PageReference saveText() // this method for inserting records into multiple objects.
        {
            try
                {
                    List<student__c> listStudent = new List<student__c>();
                    List<lineItem__c> lineItem = new List<lineItem__c>();
                   for(wrapperclass item : lstobjfields)
                    {
                            listStudent.add(item.Std);
                            lineItem.add(item.litem);  
                    }
                      if(listStudent.size() >  0 && lineItem.size() > 0)
                        insert lineItem;    // Inserting records in to multiple objects
                        insert listStudent;         
                }
            catch(Exception e)
                {
                    ApexPages.addMessages(e);
                }
            return ApexPages.currentPage();
        }
}


I hope this will be useful for u.


Welcome message for user when user loges into salesforce.

When i was exploring on home page components, i got an idea to show Welcome for user.For that i have write a small piece of code.
                We can create 3 types of homepage components
                                       Links
                                       Images
                                       Html Area.
 Where we can add Links and Images in Narrow space of homepage , html area is added to wide area of homepage . In Html Area we can write our custom Html code and we can display them in home page.
where i got an idea to show an popup/alert for user when ever he loges to salesforce.
I will explain you insteps please follow step by step


              1 .  Select Html Area component(Setup-->Appsetup-->Customize-->Home-->Home page components)
              2.  There you can find an check box " Show Html",Please select that and copy the following  code and save it as  "Homepagealert".
             
                <script>window.onload=get;
                      function get()
                      { 
                          alert('hai Hari');
                          url='/apex/user' ;
                          newwindow=window.open(url,'name','height=300,width=250');
                      }
                 </script>
              <h1>Flex And Salesforce Blog by Hari </h1>
In the above example i am showing an alert message and Vfpage as Popup.
Please find the Vfpage code:


     <apex:page wizard="true" >
             <Center><H2> Hello</H2><h1>{!$User.FirstName}</h1></center>
           <Center><B> Congratulations! You Have Successfully logged into Your Account</B</Center>
      </apex:page>


Save it. 
     Now goto Home-->Homepagelayout-->Click on Edit.
     Now you can find "Homepagealert"  in wide area section and select that and click on save. Now once logged out and logged in  to salesforce account click on home tab,you can find an alert/popup.

Thursday, 19 May 2011

Flex and GoogleMaps

We can integrate flex and Googlemaps very easily, for that we need following things.
                 1 . Google Maps API Key.(Click here )
                 2.  Google Maps Action Script component(Click here)
After you have created your account with google maps ,it will generate an API key,please copy and save it in note pad and name it as "apikey".
I will explain step by step,
 1.  Creating flex project
   Open flex builder3-->File-->New-->FlexProject-->Name is as "Demoflexmaps" -->Select 
application type as "Desktop application" -->click on save.
2.  Copying files to flex project
        1.  Copy the "apikey" file and save it to src folder of your flex project.
        2.  From downloaded zip file copy "map_flex_1_5.Swf" to your flex project "lib" folder
3. Creating flex-googlemaps
  Here i am giving MXML component file code, you can understand it by comments given by me.Copy 
this code in your source MXML file.
=================================================================
        <?xml version="1.0" encoding="utf-8"?>
<!-- http://blog.flexexamples.com/2008/08/03/using-google-maps-in-a-flex-project/ -->
<mx:Application xmlns:mx="http://www.adobe.com/2006/mxml"
        layout="vertical"
        verticalAlign="middle"
        backgroundColor="white"
        creationComplete="init();" viewSourceURL="srcview/index.html">
    
    <mx:Script>
        <![CDATA[
            import com.google.maps.LatLng;
            import com.google.maps.Map;
            import com.google.maps.MapEvent;
            import com.google.maps.controls.MapTypeControl;
            import com.google.maps.controls.PositionControl;
            import com.google.maps.controls.ZoomControl;
            import com.google.maps.services.ClientGeocoder;
            import com.google.maps.services.GeocodingEvent;
            import com.google.maps.services.GeocodingResponse;
            import com.google.maps.services.Placemark;
            import mx.controls.Alert;
            import mx.events.ResizeEvent;

            private var googleMap:Map;
            private var geocoder:ClientGeocoder;

            private function init():void {
                googleMap = new Map();
                googleMap.key = APP_ID;// we are assiging apikey,which is in apikey file.
                googleMap.addEventListener(MapEvent.MAP_READY, googleMap_mapReady);
                googleMap.setSize(new Point(mapContainer.width, mapContainer.height));
                googleMap.addControl(new ZoomControl());
                googleMap.addControl(new MapTypeControl()); 
                mapContainer.addChild(googleMap);
            }

            private function geocoder_geocodingSuccess(evt:GeocodingEvent):void {
                var result:Placemark = GeocodingResponse(evt.response).placemarks[0];
                googleMap.setCenter(result.point, 13);
            }

            private function geocoder_geocodingFailure(evt:GeocodingEvent):void {
                Alert.show("Unable to geocode address: " + evt.name);
            }

            private function googleMap_mapReady(evt:MapEvent):void {
                geocoder = new ClientGeocoder();
                geocoder.addEventListener(GeocodingEvent.GEOCODING_SUCCESS, geocoder_geocodingSuccess);
                geocoder.addEventListener(GeocodingEvent.GEOCODING_FAILURE, geocoder_geocodingFailure);
                geocoder.geocode(textInput.text);
            }

            private function button_click(evt:MouseEvent):void {
                geocoder.geocode(textInput.text);
            }
            
            private function mapContainer_resize(evt:ResizeEvent):void {
                if (googleMap) {
                    googleMap.setSize(new Point(mapContainer.width, mapContainer.height));
                }
            }
        ]]>
    </mx:Script>

    <mx:String id="APP_ID" source="apikey.txt" /> // here we are accessing your apikey file.

    <mx:ApplicationControlBar dock="true">
        <mx:Form styleName="plain">
            <mx:FormItem label="Address:"
                    direction="horizontal">
                <mx:TextInput id="textInput"
                        text="Hyderabd,India" /> // here we are giving default address.
                <mx:Button id="button"
                        label="Submit"
                        click="button_click(event);" /> 
            </mx:FormItem>
        </mx:Form>
    </mx:ApplicationControlBar>

    <mx:UIComponent id="mapContainer"
            width="100%"
            height="100%"
            resize="mapContainer_resize(event);" />
 
</mx:Application> 
===================================================================
save and run the program (Ctrl+F11),then you can find following output.


Thursday, 14 April 2011

Displaying Barcharts and piecharts of active Opportunities for every Account on vfpage

In Salesforce we can create barcharts,piecharts by creating reports on an object and we cannot display them on vfpage . when i was exploring on flex barcharts and piechart i got an idea to show Barcharts and Piecharts for active Opportunities of an account on Vfpage, so i have implemented this.

Barcharts And Piecharts in Flex:- 

  In Flex we have tags <mx:BarChart>,<mx:PieChart> to design barcharts and piecharts.

  We can bind data to them using  "dataprovider=""" attribute of  above tags.

 Example:-  
  
Piechart:- 
              <mx:PieChart width="300"
                      height="250"
                      dataProvider="{opps}"      //opps is a array collection .Here we are binding data to piecharts.
                      visible="{opps.length > 0}" // visible when we have data.
                      includeInLayout="{opps.length > 0} >
             <mx:series>
                 <mx:PieSeries field="Amount" startAngle="90"/>
             </mx:series>
             </mx:PieChart>
 

 Barcharts:- 


         <mx:BarChart id="chart" dataProvider="{opps}" width="300" height="250">
            <mx:verticalAxis>
              <mx:CategoryAxis dataProvider="{opps}" categoryField="Name"/>  // binding field to vertical axis.
            </mx:verticalAxis>
            <mx:series>
               <mx:BarSeries xField="Amount"/> // binding Amount field to x -axis.
            </mx:series>
            </mx:BarChart> 


Implementation:-

Here  there are two ways to implement this.

                     1. Every time we need to provide force.com credentials statically.
               
                    2. Passing server id,user details and account  id using Flashvar  property in <apex:Flash> tag .

i have done this using  <apex:flash>

Step 1:- In this step we need design a flex app that shows barcharts and piecharts and active opportunities list

          a .  Open flex builder, create a project and  name it as "Barcharts Demo" and select application type as Desktop application and finally click on finish.

                   Goto-->file-->New-->Flexproject.

          b.   In Force.com toolkit for flex, in bin folder we can find two files

                               1.Flex-Air swf file

                               2. Force-Flex swf file
             
                copy the both files ,and paste them in to your flex project libs folder.

          c.  Right click on your project-->New-->MXML component.Name it as BarchartsDemoapp.

                   Right click on that BarchartsDemoapp.Mxml file  and  select "Set as Default Application".

                   Now open BarchartsDemoapp.Mxml.
 
          d.  Copy the following code and paste it in that file

BarchartsDemoapp.Mxml file

   <?xml version="1.0" encoding="utf-8"?>
     <mx:Application xmlns:mx="http://www.adobe.com/2006/mxml"                                                                                             xmlns:salesforce="http://www.salesforce.com/"
                                 layout="absolute" width="100%" height="100%" 

                                 backgroundGradientAlphas="[1.0, 1.0]"
                                 backgroundGradientColors="[#FFFFFF, #FFFFFF]" 

                                 applicationComplete="init()">
   
    <mx:Script>
        <![CDATA[
            import mx.collections.ArrayCollection;
            import com.salesforce.results.QueryResult;
            import com.salesforce.results.LoginResult;
            import com.salesforce.AsyncResponder;
            import com.salesforce.objects.LoginRequest;
           
            [Bindable]
            private var opps:ArrayCollection;
           
            private function init():void
            {
                var lr:LoginRequest = new LoginRequest();
                lr.session_id = parameters.sid;   // here we have pass this from apexpage using flashvars
                lr.server_url = parameters.surl;  //
here we have pass this from apexpage using flashvars
                lr.callback = new AsyncResponder(loginHandler);
                force.login(lr);
            }       
           
            private function loginHandler(result:LoginResult):void
            {
                force.query("SELECT Name, Amount FROM Opportunity WHERE Account.Id = '" +
                    parameters.aid(
here we have pass this from apexpage using flashvars) + "'", new                   AsyncResponder(queryHandler));
            }
           
            private function queryHandler(result:QueryResult):void
            {
                opps = result.records;
            }
        ]]>
    </mx:Script>
 <salesforce:Connection id="force"/>
<mx:HDividedBox  height="50%" width="100%">
    <mx:Panel id="panel1" title="Piechart View" height="100%" width="33%">
        <mx:PieChart width="300"
                      height="250"
                      dataProvider="{opps}"
                      visible="{opps.length > 0}"
                      includeInLayout="{opps.length > 0}"
                      showDataTips="true"
                  >
             <mx:series>
                 <mx:PieSeries field="Amount" startAngle="90"/>
             </mx:series>
         </mx:PieChart>
         </mx:Panel>
         <mx:Panel id="panel" title="Barchart View" height="100%" width="33%">
                   <mx:BarChart id="chart" dataProvider="{opps}" width="300" height="250">
                        <mx:verticalAxis>
                            <mx:CategoryAxis dataProvider="{opps}" categoryField="Name"/>
                       </mx:verticalAxis>
                       <mx:series>
                       <mx:BarSeries xField="Amount"/>
                       </mx:series>
                  </mx:BarChart>
      </mx:Panel>
      <mx:Panel id="panel2" title="OpportunityList" height="100%" width="40%">
             <mx:DataGrid id="dg" height="100%" width="100%" dataProvider="{opps}">
       
            </mx:DataGrid>
       
     </mx:Panel>
</mx:HDividedBox>      
</mx:Application>

 Execute the project using CRTL+F11  or right click on project select "Runas"-->Desktop application.


Now you can find  "BarchartsDemoapp.Swf" file in the bin-debug  floder of  your project.Copy that swf file save it to your computer.


Step 2:- Uploading swf file into Force.com StaticResources.

          a.  Login to your Force.com  account.

          b.  Goto-->Setup-->AppSetup-->Develop-->Static Resources-->Click on NEW.

               Give Name as "BarchartsDemoapp" -->Browse the BarchartsDemoapp.swf file-->Select cache control as"public" and  Save the file.
 
Step 3:- We have the <apex:flash > tag to embeded the Swf file on Vfpage.

   Example:- 
                 <apex:flash src="{!$Resource.BarchartsDemoapp}" width="100%" height="700"   flashvars="sid={!$Api.Session_ID}&surl={!$Api.Partner_Server_URL_150}&aid={!accountId}"/>
 

      Explanation:-  from here we are passing  Session_Id,Server_Url,accountId  to flex .


Step 4:-  Create Apex page to display Accounts on vfpage and to display barcharts ,piecharts and active Opportunities list on vfpage.


                Goto-->Setup-->AppSetup-->Develop-->pages-->Click on New-->Name it as "Account Opportunities".

  Copy the following code and paste it  in that page.

<apex:page standardController="Account" recordSetVar="acc" extensions="AccountDetailController">
<script>
 function getId(id)
 {

    window.top.location.href='/apex/accountpage?id='+id;       
 }
</Script>
<apex:form >
        <apex:pageBlock >
            <apex:pageBlockTable value="{!acc}" var="acc1">
                    <apex:column headerValue="Accounts">
                            <apex:CommandLink onClick="getId('{!acc1.id}')">
                               {!acc1.Name}
                            </apex:Commandlink>
                    </apex:column>
            </apex:pageBlockTable>
       </apex:pageBlock>
     
       <apex:pageBlock title="Active Opportunities for Account">
                   
            <apex:flash src="{!$Resource.piebarcharts}" width="100%" height="700"       flashvars="sid={!$Api.Session_ID}&surl={!$Api.Partner_Server_URL_150}&aid={!userId}"/>
      </apex:pageBlock>
   </apex:form>
</apex:page>
 
AccountDetailController:-

  Goto-->Setup-->AppSetup-->Develop-->ApexClasses-->Click on New

        public class AccountDetailController
       {
         public AccountDetailController(ApexPages.StandardSetController controller) {
        }
        public String userId;
        public String getuserId() {return ApexPages.currentPage().getParameters().get('Id');}
       }

Save the Controller.


Now execute the page,

             /apex/Account Opportunities
              
Initially you can see only accounts on your page and with empty charts.

Now click on any account then,you can see barchats, piecharts build dynamically with opportunities data for that account.

Now you can see.........


Now you can click on every account,then see the output.
         

Flex SMS- Application using Http-Services.


I have created a small application in flex that sends SMS from flex to mobile. i have created this application by using Flex-Webservices,so first i will explain  briefly about webservices.

Flex Remoting services:-

           Flex remoting services are used to make following

                       1. Http calls to webservices
                       2. Webservices->Call Soap+Wsdl based web-services.
                       3. Remoting ->Call remote object services such as Coldfusion (or) Java.

HTTP - service is used to make Http request  and handle results.When you call Http service object's "send()" method,it makes a http request to specified "url" and Http response is returned(asyncronously). Every Http call returns a token call as "Asynctoken".The Http call results either result (or) fault,this can be handle by using "Responder". In flex we can Http-services either from MXML or from Action script.


Calling Http -services  in Flex MXML Component:-

In Flex we have " <mx:HTTPService>" tag to use Http-services.

Example:-          <mx:HTTPServices  id ="httpservice"

                             url="Your webservice url... to make request"

                             method="Get"

                             requestformat = "Text"

                            result ="resultHandler(event)"

                            fault = "faultHandler(event)"    / >


Calling Http- services in Action Script:-

 To call Http-services we need to import following

                import mx.rpc.http.HTTPService;
           
                import mx.rpc.events.ResultEvent;
            
                import mx.rpc.events.FaultEvent;

sample code:-

                var http: HTTPService = new HTTPService();

                http.url=" you webservice url.........";

                http.resultFormat = "text";
      
                http.method = "POST";
               
                http.addEventListener("result", httpResult);
               
                http.addEventListener("fault", httpFault);
                
               http.send();

  For sending Sms from flex to mobile we need to have SMS gateways that provides Api services  to make requests, my colleague charan explored on that he find many Sms-gateways providing Api servies to send sms. i haves  used following  gate ways,

                                            Sms Global   and Clickatell.


Now Creating Application:-


 Step 1:-  Creating Project in Flex3

                   Goto File-->New-->Flex Project

                   Name it as "SMS Demo App"  and Select Application type as "Web Application" and click on finish.

 Step 2:-  Goto  your project in project navigation window--> Click on src folder--> Double click on ProjectName.MXML component. Then in developing window Mxml component is opened.Now copy the following code and paste in Mxml component.


project name.mxml

<?xml version="1.0" encoding="utf-8"?>
<mx:Application xmlns:mx="http://www.adobe.com/2006/mxml" layout="absolute">
 <mx:Script>
 <![CDATA[
   import mx.rpc.http.HTTPService;

   import mx.controls.Text;
 
   import mx.controls.Alert;

   import mx.rpc.http.HTTPService;
        
   import mx.rpc.events.ResultEvent;
          
   import mx.rpc.events.FaultEvent;

   private var Fname:String;
 
   private var Phone:Number;
 
   private var msg:String;
 
   private var sUsername:String = "******";// user name of sms global or clickatell.
 
   private var sPassword:int=*******;// password of smsglobal or clickate.
 
   private var sId:String="Flex testing Sms";
 
 function send():void
 {
 
       Phone = Number(con.text);
    
       msg = inputmsg.text;
          
      Alert.show("phone number: "+Phone+"\nmessage: "+msg);
    
      var http: HTTPService = new HTTPService();
    
      http.url =" http://api.clickatell.com/http/sendmsg?user=hari****&password=*****&api_id=****&to="+Phone+"&text="+msg;  // URL to send Http requests....
    
    
     // http.url  = "http://www.smsglobal.com/http-api.php?action=sendsms&user="+sUsername+'&password='+sPassword+'&from='+sId+'&to='+Phone+'&text='+msg;  //  SMS  Global  Url to send Http requests....
 
      http.resultFormat = "text";
    
      http.method = "POST";
            
      http.addEventListener("result", httpResult);
            
      http.addEventListener("fault", httpFault);
              
      http.send();
    
     }
     public function httpResult(event:ResultEvent):void {
                var result:Object = event.result;
            //Do something with the result.
            }

    public function httpFault(event:FaultEvent):void {
                var faultstring:String = event.fault.faultString;
                Alert.show(faultstring);
              
    }

  ]]>
 </mx:Script>

 <mx:Form id="smsform" label="Sample Sms App">
            <mx:FormItem label="To(Phone Number)" required="true">
                <mx:TextInput id="con"  maxChars="12"/>
            </mx:FormItem>
            <mx:FormItem  label="MessageBody" required="true">
                <mx:TextArea id="inputmsg" />
            </mx:FormItem>
            
      <mx:Button label="Send" id="myButton" click="send()" />

 </mx:Form>

</mx:Application>

        Now you get form...

    
Note:- first you need to create Accounts @ Sms gate ways to use services.After you have created account you can get username and password.