Hi ,
Happy to have the huge response for Lightning Series - Part1 i.e create records using lightning process.
Now I am going to demonstrate on "How to display records in grid view " using lightning architecture.
As I demonstrated in Part-1, please complete all Pre-Requisites to start with lightning and create the same object.
Creating Apex Class:
/*
Author : flexandsalesforce.blogspot.com
*/
public without sharing class HB_Sobject_Datatable {
@AuraEnabled
public static DynamicSobjectWrapper fetchRecords(String SobjectAPIName)
{
List<String> lstFieldApiNames= new List<String>();
List<String> lstFieldLabels= new List<String>();
List<SObject> lstSobjectData= new List<SObject>();
Map<String, Schema.SObjectType> schemaMap = Schema.getGlobalDescribe();
Schema.SObjectType leadSchema = schemaMap.get(SobjectAPIName);
Map<String, Schema.SObjectField> fieldMap = leadSchema.getDescribe().fields.getMap();
String queryString = 'select ';
Map<Schema.SObjectField,String> fieldToAPIName = new Map<Schema.SObjectField,String>();
Map<String, String> apiNameToLabel = new Map<String, String>();
for(String fieldName : fieldMap.keySet()){
if(fieldMap.get(fieldName).getDescribe().isCreateable()){
queryString = queryString +''+fieldMap.get(fieldName)+',';
lstFieldApiNames.add(string.valueof(fieldMap.get(fieldName)));
lstFieldLabels.add(fieldMap.get(fieldName).getDescribe().getLabel());
}
}
system.debug('**********'+lstFieldApiNames);
queryString = queryString.substring(0,queryString.length()-1);
system.debug(queryString );
queryString = queryString +' from '+SobjectAPIName+' where id!=null limit 100';
system.debug(queryString );
lstSobjectData= database.query(queryString );
return new DynamicSobjectWrapper (lstFieldApiNames, lstFieldLabels, lstSobjectData);
}
public class DynamicSobjectWrapper
{
@AuraEnabled
public List<String> lstFieldApiNames{ get;set; }
@AuraEnabled
public List<String> lstFieldLabels{ get;set; }
@AuraEnabled
public List<SObject> lstSobjectData{ get;set; }
public DynamicSobjectWrapper (List<String> lstFieldApiNames, List<String> lstFieldLabels, List<SObject> lstSobjectData)
{
this.lstFieldApiNames= lstFieldApiNames;
this.lstFieldLabels= lstFieldLabels;
this.lstSobjectData= lstSobjectData;
}
}
}
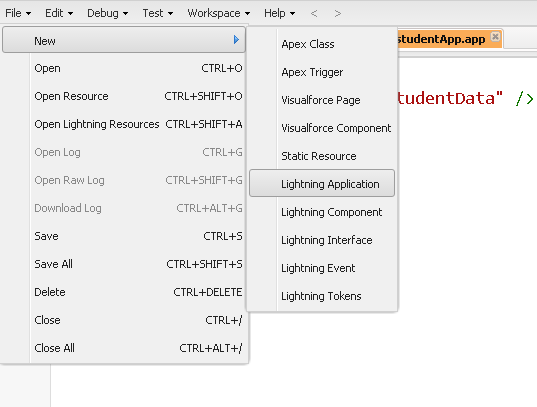
Creating Lightning Component:
Developer console ->File->New->Lightning Component

Creating Lightning Component Controller:
Create controller for the component by selecting the controller tab from the below panel. This is the main part the lightning development as it used as the middle layer between lightning UI and APEX.
Creating Lightning Component - Sobject_DataTable:
<aura:component controller="HB_Sobject_Datatable" implements="force:appHostable,flexipage:availableForAllPageTypes,forceCommunity:availableForAllPageTypes" access="global">
<ltng:require scripts="/resource/Dynamic_DataTable/js/datatables.min.js"
styles="/resource/Dynamic_DataTable/css/datatables.min.css" afterScriptsLoaded="{!c.init}"/>
<aura:attribute name="SobjectName" type="string" description="SobjectAPIName" />
<aura:attribute name="lstSobjectData" type="SObject[]" />
<aura:attribute name="lstFieldApiNames" type="string[]" />
<aura:attribute name="lstFieldLabels" type="string[]" />
<aura:attribute name="noDataText" type="String" default="No data found." description="The text to display when no data is found. Default value is “No data found.”"/>
<aura:handler event="aura:waiting" action="{!c.showSpinner}"/>
<aura:handler event="aura:doneWaiting" action="{!c.hideSpinner}"/>
<center><ui:spinner aura:id="spinner"/></center>
<aura:if isTrue="{!v.lstSobjectData.length > 0}">
<table id="example" class="table table-striped table-bordered dt-responsive" cellspacing="0" width="100%">
<thead>
<tr>
<aura:iteration var="fldlbl" items="{!v.lstFieldLabels}">
<th>{!fldlbl}</th>
</aura:iteration>
</tr>
</thead>
<tbody>
<aura:iteration items="{!v.lstSobjectData}" var="item">
<tr>
<aura:iteration var="fldApi" items="{!v.lstFieldApiNames}">
<td>
<c:displaySobjectFields objSobject="{!item}" fieldapi="{!fldApi}"></c:displaySobjectFields>
</td>
</aura:iteration>
</tr>
</aura:iteration>
</tbody>
</table>
<aura:set attribute="else">
<ui:message severity="info">{!v.noDataText}</ui:message>
</aura:set>
</aura:if>
</aura:component>
Creating Lightning Component -Sobject_DataTableController:
({
init : function(component, event, helper) {
var action = component.get("c.fetchRecords");
action.setParams({SobjectAPIName:component.get("v.SobjectName")});
action.setCallback(this, function(response) {
var state = response.getState();
if (state === "SUCCESS") {
var result = response.getReturnValue();
component.set("v.lstSobjectData", result.lstSobjectData);
component.set("v.lstFieldApiNames", result.lstFieldApiNames);
component.set("v.lstFieldLabels", result.lstFieldLabels);
setTimeout(function(){ $('#example').DataTable(); }, 500);
}
else if (state === "ERROR") {
$A.log("Errors", a.getError());
}
});
$A.enqueueAction(action);
},
showSpinner : function (component, event, helper) {
var spinner = component.find('spinner');
var evt = spinner.get("e.toggle");
evt.setParams({ isVisible : true });
evt.fire();
},
hideSpinner : function (component, event, helper) {
var spinner = component.find('spinner');
var evt = spinner.get("e.toggle");
evt.setParams({ isVisible : false });
evt.fire();
}
})
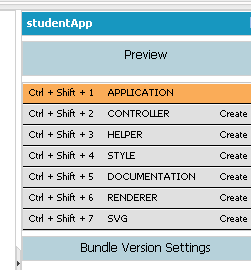
Creating Application:
Creating an Application to host the component:
Now click on the preview button to execute the Application.
Here is the output:

Search :

aura:if
aura:if evaluates the isTrue expression on the server and instantiates components in either its body or else attribute. Only one branch is created and rendered. Switching condition unrenders and destroys the current branch and generates the other
<aura:component>
<aura:if isTrue="{!v.truthy}">
True
<aura:set attribute="else">
False
</aura:set>
</aura:if>
</aura:component>
Thank you.
Happy to have the huge response for Lightning Series - Part1 i.e create records using lightning process.
Now I am going to demonstrate on "How to display records in grid view " using lightning architecture.
As I demonstrated in Part-1, please complete all Pre-Requisites to start with lightning and create the same object.
Step1 : Create student object - APINAME : Student__c
Step2: Below is the components needs to be created.
Creating Apex Class.
Creating Lightning Component - Display Data Dynamically.
Creating Lightning Component - Display Data Dynamically - Controller
Creating Lightning Component - Data Table
Creating Lightning Component - Data Table-controller
Creating an Application to host the component.
Test the Application
Creating Apex Class:
/*
Author : flexandsalesforce.blogspot.com
*/
public without sharing class HB_Sobject_Datatable {
@AuraEnabled
public static DynamicSobjectWrapper fetchRecords(String SobjectAPIName)
{
List<String> lstFieldApiNames= new List<String>();
List<String> lstFieldLabels= new List<String>();
List<SObject> lstSobjectData= new List<SObject>();
Map<String, Schema.SObjectType> schemaMap = Schema.getGlobalDescribe();
Schema.SObjectType leadSchema = schemaMap.get(SobjectAPIName);
Map<String, Schema.SObjectField> fieldMap = leadSchema.getDescribe().fields.getMap();
String queryString = 'select ';
Map<Schema.SObjectField,String> fieldToAPIName = new Map<Schema.SObjectField,String>();
Map<String, String> apiNameToLabel = new Map<String, String>();
for(String fieldName : fieldMap.keySet()){
if(fieldMap.get(fieldName).getDescribe().isCreateable()){
queryString = queryString +''+fieldMap.get(fieldName)+',';
lstFieldApiNames.add(string.valueof(fieldMap.get(fieldName)));
lstFieldLabels.add(fieldMap.get(fieldName).getDescribe().getLabel());
}
}
system.debug('**********'+lstFieldApiNames);
queryString = queryString.substring(0,queryString.length()-1);
system.debug(queryString );
queryString = queryString +' from '+SobjectAPIName+' where id!=null limit 100';
system.debug(queryString );
lstSobjectData= database.query(queryString );
return new DynamicSobjectWrapper (lstFieldApiNames, lstFieldLabels, lstSobjectData);
}
public class DynamicSobjectWrapper
{
@AuraEnabled
public List<String> lstFieldApiNames{ get;set; }
@AuraEnabled
public List<String> lstFieldLabels{ get;set; }
@AuraEnabled
public List<SObject> lstSobjectData{ get;set; }
public DynamicSobjectWrapper (List<String> lstFieldApiNames, List<String> lstFieldLabels, List<SObject> lstSobjectData)
{
this.lstFieldApiNames= lstFieldApiNames;
this.lstFieldLabels= lstFieldLabels;
this.lstSobjectData= lstSobjectData;
}
}
}
Developer console ->File->New->Lightning Component

Creating Lightning Component - displaySobjectFields:
<aura:component >
<aura:handler name="init" value="{!this}" action="{!c.doInit}"/>
<aura:attribute name="objSobject" type="Sobject" />
<aura:attribute name="fieldapi" type="String" />
<aura:attribute name="fielvalue" type="String" />
<div><ui:outputText value="{!v.fielvalue}"/></div>
</aura:component>
Create controller for the component by selecting the controller tab from the below panel. This is the main part the lightning development as it used as the middle layer between lightning UI and APEX.
Creating Lightning Component - displaySobjectFieldsController
({
doInit : function(component, event, helper) {
var varSobject = component.get("v.objSobject");
var api = component.get("v.fieldapi");
var arrayRecords = varSobject[api.split('.')[0]];
if(arrayRecords != undefined && api.indexOf('.')>= 0)
component.set("v.fielvalue", arrayRecords[api.split('.')[1]]);
else
component.set("v.fielvalue", varSobject[api]);
}
})
Creating Lightning Component - Sobject_DataTable:
<aura:component controller="HB_Sobject_Datatable" implements="force:appHostable,flexipage:availableForAllPageTypes,forceCommunity:availableForAllPageTypes" access="global">
<ltng:require scripts="/resource/Dynamic_DataTable/js/datatables.min.js"
styles="/resource/Dynamic_DataTable/css/datatables.min.css" afterScriptsLoaded="{!c.init}"/>
<aura:attribute name="SobjectName" type="string" description="SobjectAPIName" />
<aura:attribute name="lstSobjectData" type="SObject[]" />
<aura:attribute name="lstFieldApiNames" type="string[]" />
<aura:attribute name="lstFieldLabels" type="string[]" />
<aura:attribute name="noDataText" type="String" default="No data found." description="The text to display when no data is found. Default value is “No data found.”"/>
<aura:handler event="aura:waiting" action="{!c.showSpinner}"/>
<aura:handler event="aura:doneWaiting" action="{!c.hideSpinner}"/>
<center><ui:spinner aura:id="spinner"/></center>
<aura:if isTrue="{!v.lstSobjectData.length > 0}">
<table id="example" class="table table-striped table-bordered dt-responsive" cellspacing="0" width="100%">
<thead>
<tr>
<aura:iteration var="fldlbl" items="{!v.lstFieldLabels}">
<th>{!fldlbl}</th>
</aura:iteration>
</tr>
</thead>
<tbody>
<aura:iteration items="{!v.lstSobjectData}" var="item">
<tr>
<aura:iteration var="fldApi" items="{!v.lstFieldApiNames}">
<td>
<c:displaySobjectFields objSobject="{!item}" fieldapi="{!fldApi}"></c:displaySobjectFields>
</td>
</aura:iteration>
</tr>
</aura:iteration>
</tbody>
</table>
<aura:set attribute="else">
<ui:message severity="info">{!v.noDataText}</ui:message>
</aura:set>
</aura:if>
</aura:component>
Creating Lightning Component -Sobject_DataTableController:
init : function(component, event, helper) {
var action = component.get("c.fetchRecords");
action.setParams({SobjectAPIName:component.get("v.SobjectName")});
action.setCallback(this, function(response) {
var state = response.getState();
if (state === "SUCCESS") {
var result = response.getReturnValue();
component.set("v.lstSobjectData", result.lstSobjectData);
component.set("v.lstFieldApiNames", result.lstFieldApiNames);
component.set("v.lstFieldLabels", result.lstFieldLabels);
setTimeout(function(){ $('#example').DataTable(); }, 500);
}
else if (state === "ERROR") {
$A.log("Errors", a.getError());
}
});
$A.enqueueAction(action);
},
showSpinner : function (component, event, helper) {
var spinner = component.find('spinner');
var evt = spinner.get("e.toggle");
evt.setParams({ isVisible : true });
evt.fire();
},
hideSpinner : function (component, event, helper) {
var spinner = component.find('spinner');
var evt = spinner.get("e.toggle");
evt.setParams({ isVisible : false });
evt.fire();
}
})
Creating Application:

Creating an Application to host the component:
<aura:application >
<c:Sobject_DataTable SobjectName="XX_MSG1__Student__c"/>
</aura:application>
<c:Sobject_DataTable SobjectName="XX_MSG1__Student__c"/>
</aura:application>
Now click on the preview button to execute the Application.
Here is the output:

Search :

aura:if
aura:if evaluates the isTrue expression on the server and instantiates components in either its body or else attribute. Only one branch is created and rendered. Switching condition unrenders and destroys the current branch and generates the other
<aura:component>
<aura:if isTrue="{!v.truthy}">
True
<aura:set attribute="else">
False
</aura:set>
</aura:if>
</aura:component>
Thank you.


